**note** Be careful tweaking this model in customizer. If you're guesstimating the dimensions (because you only have 1 set of calipers) each file you download will have very similar filenames and it's easy to get them mixed up
Last Edit: Oct 28, 2014 22:08:00 GMT -5 by jimustanguitar
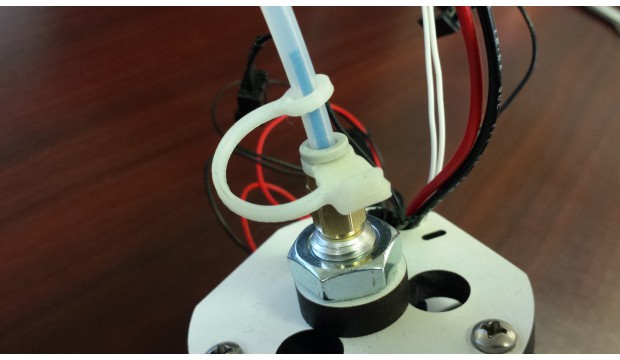
"This PTC Lock Snap will fit the standard 4mm quick connect PTC fittings on the Rostock Max and Orion Delta printers ensuring that the fitting remains engaged onto the PTFE tube. The retention loop will attach to the PTFE tube to ensure that you don't loose the part when changing filament." - JJ Johnson
"This PTC Lock Snap will fit the standard 4mm quick connect PTC fittings on the Rostock Max and Orion Delta printers ensuring that the fitting remains engaged onto the PTFE tube. The retention loop will attach to the PTFE tube to ensure that you don't loose the part when changing filament." - JJ Johnson
I guess I should have asked how it would do that - what does it do that ensures it stays locked?
Hardware eventually fails. Software eventually works.
It snaps between the metal part and the plastic of a push to connect. How you push the fitting together to release it and pull apart, this just holds it apart.
If you watch a ptc fitting when retracts happen there is lots of movement in this fitting, this eliminates it. Great part....
It snaps between the metal part and the plastic of a push to connect. How you push the fitting together to release it and pull apart, this just holds it apart.
If you watch a ptc fitting when retracts happen there is lots of movement in this fitting, this eliminates it. Great part....
Ah - that makes sense. I was trying to figure out how the little strip of plastic would be able to act as a spring to keep the parts pulled together.
Hardware eventually fails. Software eventually works.
Post by bvandiepenbos on Dec 22, 2014 13:47:27 GMT -5
Made replacements for missing caps on legs of this dresser Saturday. Create model in Design Spark -- 20 minutes Print parts -- 90 minutes Plastic filament -- 50¢ maybe Brownie points earned from Rebecca -- Priceless!
Attention has turned to an aerial snow sensor. This one is mounted on a pole rather than in the pavement like the one described earlier. One 3D printed housing is shown here..
With electronics and software installed, a few variations are now on test in the back yard.
_
The big unit on the left is a competitor’s snow sensor unit – the gold standard for this test. The slender units are testing ideas for three different tops and two different software schemes.
Power is supplied from inside, where the test is monitored.
The sensors are wired to an Arduino which is just barely visible on top the computer. The computer is running the Arduino IDE and logging data with RealTerm. The data is time stamped and saved so that it is easy to review the sensors’ actions during a snow event.
This project would not have been practical to do without the 3D printer!